How to Use Firefly Email with Gmail: Difference between revisions
No edit summary |
Add TOC |
||
| (One intermediate revision by the same user not shown) | |||
| Line 1: | Line 1: | ||
The best communication tool is the one that you use, so by default your Firefly email address forwards to your personal email address, and many Fireflies currently use Gmail. (If you'd like to use the Firefly Zimbra server, which gives you access to historical list archives, see [[How to Use Firefly Email with Zimbra]].) | The best communication tool is the one that you use, so by default your Firefly email address forwards to your personal email address, and many Fireflies currently use Gmail. (If you'd like to use the Firefly Zimbra server, which gives you access to historical list archives, see [[How to Use Firefly Email with Zimbra]].) | ||
To avoid missing messages due to Gmail's spam filtering, we recommend you '''add a filter to prevent Firefly mail from being classified as Spam'''. See the section "[[How to Use Firefly Email with Gmail|Adding a Filter to Avoid Missing Messages]]" below. | To avoid missing messages due to Gmail's spam filtering, we recommend you '''add a filter to prevent Firefly mail from being classified as Spam'''. See the section "[[How to Use Firefly Email with Gmail#Adding a Filter to Avoid Missing Messages|Adding a Filter to Avoid Missing Messages]]" below. | ||
Mail for your Firefly email address, and any team distribution lists you are on, is forwarded to your Gmail address. This page helps you get set up so you can send from your Firefly email address within Gmail. | Mail for your Firefly email address, and any team distribution lists you are on, is forwarded to your Gmail address. This page helps you get set up so you can send from your Firefly email address within Gmail. | ||
| Line 7: | Line 7: | ||
'''IMPORTANT''': If you want to use Firefly Email from your mobile device, please use the '''official Gmail app''' ([https://itunes.apple.com/app/apple-store/id422689480?pt=9008&ct=web_about&mt=8 iOS], [https://play.google.com/store/apps/details?id=com.google.android.gm&referrer=utm_source%3Dweb_about Android]) instead of the native mail client. The Gmail app automatically lets you send as your Firefly email address once you have configured Gmail as below. | '''IMPORTANT''': If you want to use Firefly Email from your mobile device, please use the '''official Gmail app''' ([https://itunes.apple.com/app/apple-store/id422689480?pt=9008&ct=web_about&mt=8 iOS], [https://play.google.com/store/apps/details?id=com.google.android.gm&referrer=utm_source%3Dweb_about Android]) instead of the native mail client. The Gmail app automatically lets you send as your Firefly email address once you have configured Gmail as below. | ||
== Step 1 == | ==Step 1== | ||
Log into your GMail account. Click on the "gear" in upper right corner of the page, then select "Settings" from the dropdown menu. | Log into your GMail account. Click on the "gear" in upper right corner of the page, then select "Settings" from the dropdown menu. | ||
[[File:Gmail-1.png|none|frame|Step 1 - "Settings"]] | [[File:Gmail-1.png|none|frame|Step 1 - "Settings"]] | ||
== Step 2 == | ==Step 2== | ||
From the "Settings" panel, select the "Accounts and Import" tab. Note the section labelled "'''Send Mail as:'''". This section will display your current Gmail address first (in this example, "jeredfloyd@gmail.com") and then any additional addresses you have previously configured. | From the "Settings" panel, select the "Accounts and Import" tab. Note the section labelled "'''Send Mail as:'''". This section will display your current Gmail address first (in this example, "jeredfloyd@gmail.com") and then any additional addresses you have previously configured. | ||
| Line 17: | Line 17: | ||
[[File:Gmail-2.png|none|frame|Step 2 - "Send Mail As" settings|914x914px]] | [[File:Gmail-2.png|none|frame|Step 2 - "Send Mail As" settings|914x914px]] | ||
== Step 3 == | ==Step 3== | ||
Gmail will open a pop-up window titled "Add another email address you own". Enter your Firefly email address on this page. | Gmail will open a pop-up window titled "Add another email address you own". Enter your Firefly email address on this page. | ||
| Line 27: | Line 27: | ||
[[File:Gmail-3.png|none|frame|Step 3 - "Add another email" page 1]] | [[File:Gmail-3.png|none|frame|Step 3 - "Add another email" page 1]] | ||
== Step 4 == | ==Step 4== | ||
To prevent your email from being marked as spam, Gmail must send your outgoing mail through the Firefly email server. This page specifies the settings for Gmail to be able to do this. On this page, enter: | To prevent your email from being marked as spam, Gmail must send your outgoing mail through the Firefly email server. This page specifies the settings for Gmail to be able to do this. On this page, enter: | ||
* '''SMTP Server:''' smtp.fireflyartscollective.org | |||
* '''Port:''' 587 [this is the default] | *'''SMTP Server:''' smtp.fireflyartscollective.org | ||
* '''Username:''' [Your Firefly full email address] | *'''Port:''' 587 [this is the default] | ||
* '''Password:''' [Your Firefly Account password] | *'''Username:''' [Your Firefly full email address] | ||
*'''Password:''' [Your Firefly Account password] | |||
Your Firefly Account password was sent to you when your account was established. If you can't remember your password, contact [mailto:tech@fireflyartscollective.org tech@fireflyartscollective.org] to have it reset. | Your Firefly Account password was sent to you when your account was established. If you can't remember your password, contact [mailto:tech@fireflyartscollective.org tech@fireflyartscollective.org] to have it reset. | ||
| Line 40: | Line 42: | ||
[[File:Gmail-4.png|none|frame|Step 4 - "Add another email" page 2]] | [[File:Gmail-4.png|none|frame|Step 4 - "Add another email" page 2]] | ||
== Step 5 == | ==Step 5== | ||
Gmail must verify that the email address you entered is one that you actually own; it does this by sending a confirmation message to your Firefly email address, which will forward to your Gmail address. In your Gmail window look for this new message and either click on the provided link, or copy the confirmation code into the "add another email address" pop-up window. | Gmail must verify that the email address you entered is one that you actually own; it does this by sending a confirmation message to your Firefly email address, which will forward to your Gmail address. In your Gmail window look for this new message and either click on the provided link, or copy the confirmation code into the "add another email address" pop-up window. | ||
[[File:Gmail-5.png|none|frame|Step 5 - "Add another email" page 3]] | [[File:Gmail-5.png|none|frame|Step 5 - "Add another email" page 3]] | ||
== Step 6 == | ==Step 6== | ||
The "Send mail as:" section of your settings should look like the below after you have successfully added your Firefly email address. | The "Send mail as:" section of your settings should look like the below after you have successfully added your Firefly email address. | ||
| Line 50: | Line 52: | ||
[[File:Gmail-6.png|none|frame|921x921px|Step 6 - "Send Mail As" configured successfully]] | [[File:Gmail-6.png|none|frame|921x921px|Step 6 - "Send Mail As" configured successfully]] | ||
== Sending Mail from your Firefly Email Address == | ==Sending Mail from your Firefly Email Address== | ||
To send mail from your Firefly email address, compose a new message. Next to the "From" header there will now appear a small arrow for a dropdown menu. From this menu you can select your Firefly email address as the sender. | To send mail from your Firefly email address, compose a new message. Next to the "From" header there will now appear a small arrow for a dropdown menu. From this menu you can select your Firefly email address as the sender. | ||
[[File:Gmail-7.png|none|frame|Composing a message from your Firefly email address]] | [[File:Gmail-7.png|none|frame|Composing a message from your Firefly email address]] | ||
== Sending Mail from a Firefly Distribution List Address == | ==Sending Mail from a Firefly Distribution List Address== | ||
If you are a Firefly Core or Cluster Lead you may want to send mail from your team contact address, such as "placement@fireflyartscollective.org" or "transport@fireflyartscollective.org"; this way any replies will go back to the contact address so everyone will receive it. | If you are a Firefly Core or Cluster Lead you may want to send mail from your team contact address, such as "placement@fireflyartscollective.org" or "transport@fireflyartscollective.org"; this way any replies will go back to the contact address so everyone will receive it. | ||
| Line 60: | Line 62: | ||
In '''Step 3''': Enter the name and email address for your team contact address, such as: | In '''Step 3''': Enter the name and email address for your team contact address, such as: | ||
* Name: "Popcorn Core" | |||
* Email address: "popcorn@fireflyartscollective.org" | *Name: "Popcorn Core" | ||
* '''Uncheck''' "Treat as an alias." <u>This is critical so that you will see mail sent to the contact address.</u> | *Email address: "popcorn@fireflyartscollective.org" | ||
*'''Uncheck''' "Treat as an alias." <u>This is critical so that you will see mail sent to the contact address.</u> | |||
In '''Step 4''': Use your personal Firefly Account email address and password, exactly as above. | In '''Step 4''': Use your personal Firefly Account email address and password, exactly as above. | ||
== Changing Your Password == | ==Changing Your Password== | ||
See [[How to Use Firefly Email with Zimbra#Changing Your Password]]. | See [[How to Use Firefly Email with Zimbra#Changing Your Password]]. | ||
== Adding a Filter to Avoid Missing Messages == | ==Adding a Filter to Avoid Missing Messages== | ||
Gmail will sometimes classify forwarded messages as spam, which can prevent you from seeing important mail. This is especially likely with mail from outside organizations (such as banks) where forwarding makes it look to Gmail as if the email has been faked to come from that organization. To avoid missing messages, you should add a filter to your Gmail to prevent Firefly mail from being categorized as spam. | Gmail will sometimes classify forwarded messages as spam, which can prevent you from seeing important mail. This is especially likely with mail from outside organizations (such as banks) where forwarding makes it look to Gmail as if the email has been faked to come from that organization. To avoid missing messages, you should add a filter to your Gmail to prevent Firefly mail from being categorized as spam. | ||
=== Step 1 === | ===Step 1=== | ||
Log into your GMail account. Click on the "gear" in upper right corner of the page, then select "Settings" from the dropdown menu. | Log into your GMail account. Click on the "gear" in upper right corner of the page, then select "Settings" from the dropdown menu. | ||
[[File:Gmail-1.png|none|frame|Step 1 - "Settings"]] | [[File:Gmail-1.png|none|frame|Step 1 - "Settings"]] | ||
=== Step 2 === | ===Step 2=== | ||
From the "Settings" panel, select the "Filters and Blocked Addresses" tab. Click on "'''Create a New Filter'''". | From the "Settings" panel, select the "Filters and Blocked Addresses" tab. Click on "'''Create a New Filter'''". | ||
[[File:Filter 1.png|none|frame|901x901px|Step 2 - "Filters and Blocked Addresses" settings]] | [[File:Filter 1.png|none|frame|901x901px|Step 2 - "Filters and Blocked Addresses" settings]] | ||
=== Step 3 === | ===Step 3=== | ||
Gmail will open a pop-up window below the search bar. In the section labelled "To:", type "@fireflyartscollective.org". | Gmail will open a pop-up window below the search bar. In the section labelled "To:", type "@fireflyartscollective.org". | ||
| Line 85: | Line 89: | ||
[[File:Filter 2.png|none|frame|569x569px|Step 3 - Adding a filter - search]] | [[File:Filter 2.png|none|frame|569x569px|Step 3 - Adding a filter - search]] | ||
=== Step 4 === | ===Step 4=== | ||
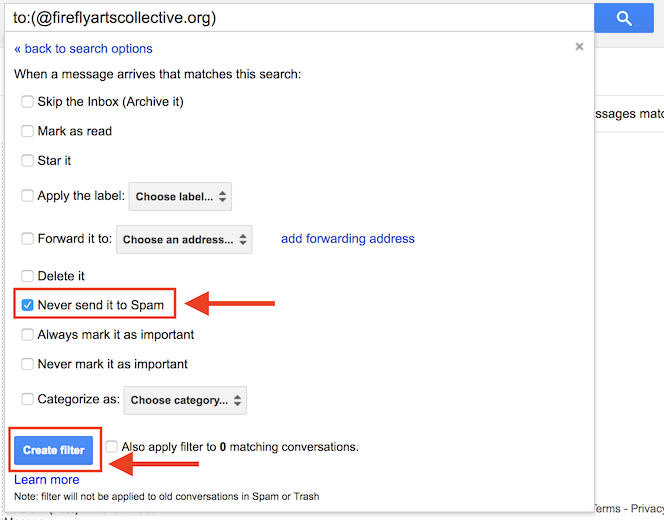
The pop-up will update to a new form. On this form, click the checkbox next to "'''Never send it to Spam'''". | The pop-up will update to a new form. On this form, click the checkbox next to "'''Never send it to Spam'''". | ||
| Line 91: | Line 95: | ||
[[File:Filter 3.png|none|frame|569x569px|Step 4 - Adding a filter - action]] | [[File:Filter 3.png|none|frame|569x569px|Step 4 - Adding a filter - action]] | ||
=== Step 5 === | ===Step 5=== | ||
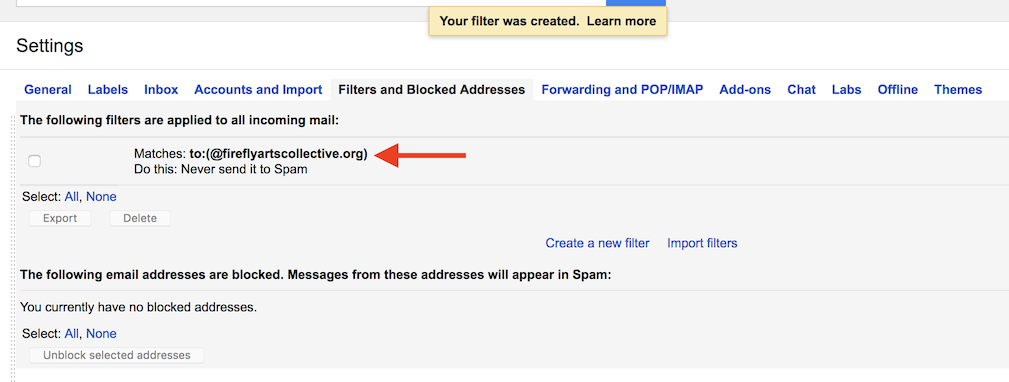
The "The following filters are applied to all incoming mail:" section of your settings should look like the below after you have successfully added the filter. | The "The following filters are applied to all incoming mail:" section of your settings should look like the below after you have successfully added the filter. | ||
[[File:Filter 4.png|none|frame|901x901px|Step 5 - Filter successfully created]] | [[File:Filter 4.png|none|frame|901x901px|Step 5 - Filter successfully created]] | ||
Latest revision as of 13:04, 12 January 2020
The best communication tool is the one that you use, so by default your Firefly email address forwards to your personal email address, and many Fireflies currently use Gmail. (If you'd like to use the Firefly Zimbra server, which gives you access to historical list archives, see How to Use Firefly Email with Zimbra.)
To avoid missing messages due to Gmail's spam filtering, we recommend you add a filter to prevent Firefly mail from being classified as Spam. See the section "Adding a Filter to Avoid Missing Messages" below.
Mail for your Firefly email address, and any team distribution lists you are on, is forwarded to your Gmail address. This page helps you get set up so you can send from your Firefly email address within Gmail.
IMPORTANT: If you want to use Firefly Email from your mobile device, please use the official Gmail app (iOS, Android) instead of the native mail client. The Gmail app automatically lets you send as your Firefly email address once you have configured Gmail as below.
Step 1
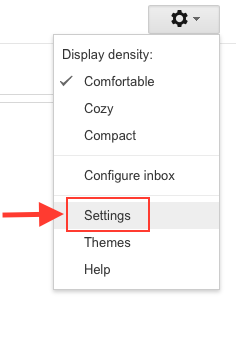
Log into your GMail account. Click on the "gear" in upper right corner of the page, then select "Settings" from the dropdown menu.
Step 2
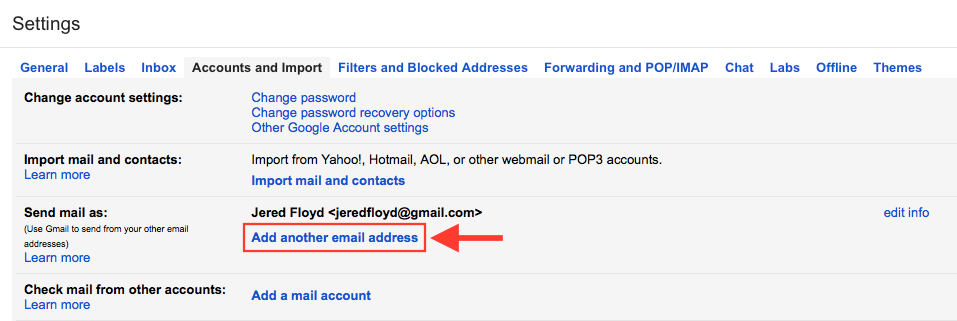
From the "Settings" panel, select the "Accounts and Import" tab. Note the section labelled "Send Mail as:". This section will display your current Gmail address first (in this example, "jeredfloyd@gmail.com") and then any additional addresses you have previously configured.
Click on "Add another email address" to add your Firefly email address.
Step 3
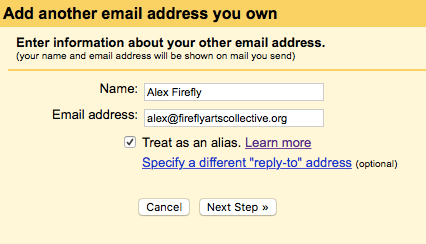
Gmail will open a pop-up window titled "Add another email address you own". Enter your Firefly email address on this page.
The example below is what you would type if your name is "Alex Firefly" and your Firefly email address is "alex@fireflyartscollective.org". Replace these with your name and Firefly email address.
Leave the "Treat as alias" checkbox selected.
Click "Next Step »".
Step 4
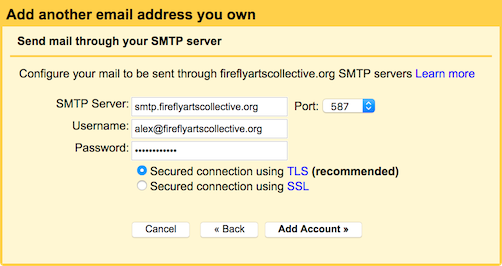
To prevent your email from being marked as spam, Gmail must send your outgoing mail through the Firefly email server. This page specifies the settings for Gmail to be able to do this. On this page, enter:
- SMTP Server: smtp.fireflyartscollective.org
- Port: 587 [this is the default]
- Username: [Your Firefly full email address]
- Password: [Your Firefly Account password]
Your Firefly Account password was sent to you when your account was established. If you can't remember your password, contact tech@fireflyartscollective.org to have it reset.
Once you have entered the settings, click "Add Account »".
If you receive the error "Authentication failed. Please check your username/password." make sure all the settings are correct, try entering your password again, and then contact tech@fireflyartscollective.org if you are still having difficulties.
Step 5
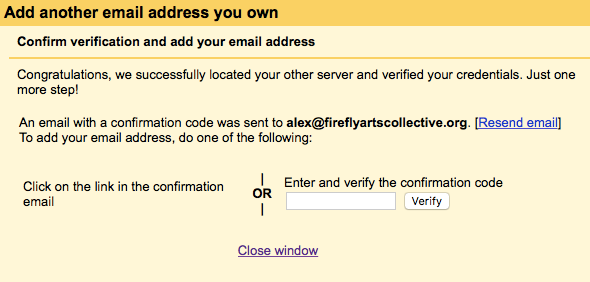
Gmail must verify that the email address you entered is one that you actually own; it does this by sending a confirmation message to your Firefly email address, which will forward to your Gmail address. In your Gmail window look for this new message and either click on the provided link, or copy the confirmation code into the "add another email address" pop-up window.
Step 6
The "Send mail as:" section of your settings should look like the below after you have successfully added your Firefly email address.
Note the section "When replying to a message:". We recommend selecting "Reply from the same address the message was sent to" so that you will reply from your Firefly email address to any mail sent to your Firefly email address.

Sending Mail from your Firefly Email Address
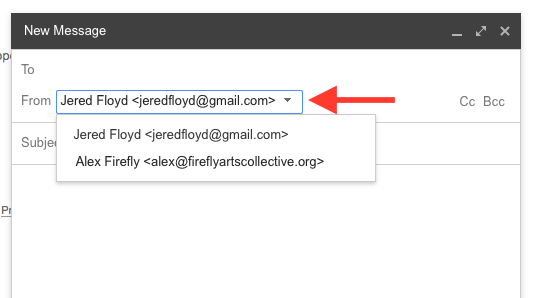
To send mail from your Firefly email address, compose a new message. Next to the "From" header there will now appear a small arrow for a dropdown menu. From this menu you can select your Firefly email address as the sender.
Sending Mail from a Firefly Distribution List Address
If you are a Firefly Core or Cluster Lead you may want to send mail from your team contact address, such as "placement@fireflyartscollective.org" or "transport@fireflyartscollective.org"; this way any replies will go back to the contact address so everyone will receive it.
To configure an additional "Send Mail As" address for your team contact address, go through the process above with a few small changes.
In Step 3: Enter the name and email address for your team contact address, such as:
- Name: "Popcorn Core"
- Email address: "popcorn@fireflyartscollective.org"
- Uncheck "Treat as an alias." This is critical so that you will see mail sent to the contact address.
In Step 4: Use your personal Firefly Account email address and password, exactly as above.
Changing Your Password
See How to Use Firefly Email with Zimbra#Changing Your Password.
Adding a Filter to Avoid Missing Messages
Gmail will sometimes classify forwarded messages as spam, which can prevent you from seeing important mail. This is especially likely with mail from outside organizations (such as banks) where forwarding makes it look to Gmail as if the email has been faked to come from that organization. To avoid missing messages, you should add a filter to your Gmail to prevent Firefly mail from being categorized as spam.
Step 1
Log into your GMail account. Click on the "gear" in upper right corner of the page, then select "Settings" from the dropdown menu.

Step 2
From the "Settings" panel, select the "Filters and Blocked Addresses" tab. Click on "Create a New Filter".

Step 3
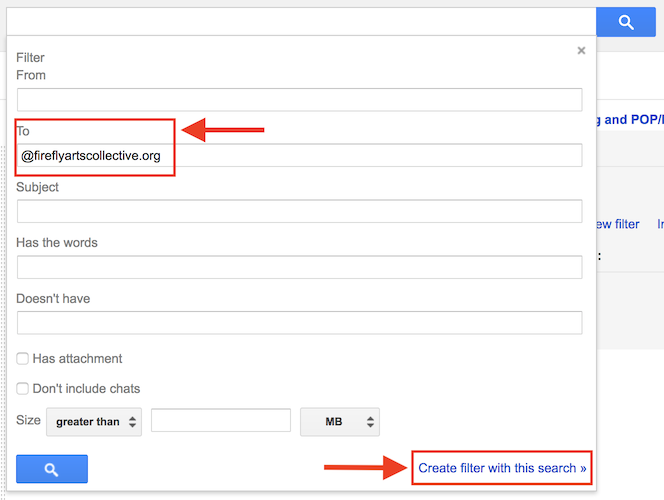
Gmail will open a pop-up window below the search bar. In the section labelled "To:", type "@fireflyartscollective.org".
Click "Create filter with this search »"
Step 4
The pop-up will update to a new form. On this form, click the checkbox next to "Never send it to Spam".
Click "Create filter" to complete the process.
Step 5
The "The following filters are applied to all incoming mail:" section of your settings should look like the below after you have successfully added the filter.
