How to Use Firefly Email with Zimbra
Firefly mail and distribution lists are maintained on Zimbra Collaboration Server with a web interface at https://mail.fireflyartscollective.org/. You can log into Zimbra to change your mail settings, read list archives, change your Firefly Account password, and send and receive mail. Zimbra is like "private Gmail" (or Exchange) for Firefly, and it works in a very similar way.
To get started, go to https://mail.fireflyartscollective.org/ and log in with your Firefly Account address and password. Your Firefly Account password was sent to you when your account was established. If you can't remember your password, contact tech@fireflyartscollective.org to have it reset. You will be required to create a new password the first time you log in.
Keeping Your Mail on the Firefly Zimbra Server
The default for new Firefly email addresses is to forward all mail to your personal email address and NOT keep a local copy. If you would like to keep your accounts separate, or just want to use the Zimbra interface as well, you must change your mail forwarding settings.
1) Log in to the Zimbra Web Client at https://mail.fireflyartscollective.org/
2) Click on the "Preferences" tab at the top of the screen.
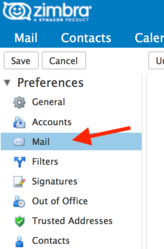
3) Click on the "Mail" list item on the left.
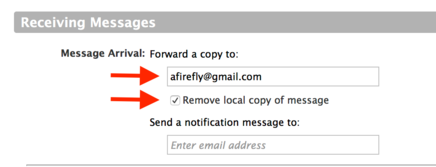
4) Scroll down to the section "Receiving Messages" on the right. To keep copies of your Firefly email on Zimbra, uncheck the box "Remove local copy of message". To stop forwarding email to your personal account entirely, also delete your address from the "Forward a copy to" box.
5) Click on the "Calendar" list item on the left. Also delete your address from the "Forward Invites" box.
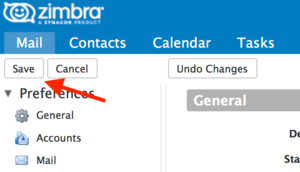
6) Finally, Click the "Save" button in the upper left.
Sending Mail from a Firefly Distribution List Address
If you are a Firefly Core or Cluster Lead you may want to send mail from your team contact address, such as "placement@fireflyartscollective.org" or "transport@fireflyartscollective.org"; this way any replies will go back to the contact address so everyone will receive it. Zimbra calls these additional "Send Mail As" addresses "Personas". To configure a Persona:
1) Click on the "Preferences" tab at the top of the screen.
2) Click on the "Accounts" list item on the left.
3) Click "Add Persona". This will create a New Persona under Accounts.
[Image 6]
4) Under "Persona Settings", enter the name and email address for your team contact address, such as:
- Persona Name: "Popcorn Core"
- From: "Popcorn Core", "popcorn@fireflyartscollective.org"
Also note the setting further down the page, "Use this persona: when replying or forwarding messages sent to:". If you check this box and enter your team contact address again, you will automatically use this persona when replying to a message sent to your team.
[Image 7]
5) Finally, Click the "Save" button in the upper left.
Finding and Reading Distribution List Archives
TODO
Learning More About Zimbra Collaboration Suite
Zimbra is easy to use, but there's a lot you can do with it. If you'd like to learn more, check:
- The online help documentation at https://mail.fireflyartscollective.org/help/en_US/advanced/zimbra_user_help.htm
- Video tutorials at https://help.zimbra.com/videos/8x/
Using Firefly Email with a Desktop Mail Client
TODO
Using Firefly Email with Your Mobile Device
iOS: How to Use Firefly Email with iOS illustrates how to configure your iOS device to use the Firefly Zimbra server to send and receive email.
Android: See the section on "Using Firefly Email with a Desktop Mail Client" above. (Perhaps we will make a visual guide in the future.)


