Radio Tech: Difference between revisions
Jump to navigation
Jump to search
Removed redirect to Radio Tech 2018 Tags: Removed redirect Visual edit: Switched |
No edit summary |
||
| Line 1: | Line 1: | ||
This page describes the 2019 rental radio setup. For information on 2018 and earlier radios, see [[Radio Tech 2018]]. | ''This page describes the 2019 rental radio setup. For information on 2018 and earlier radios, see [[Radio Tech 2018]].'' | ||
<br /> | |||
== Radio Equipment/Rentals == | |||
We're renting radios from [https://eventradiorentals.com Event Radio Rentals]. | |||
Work Weekend 2 (Placement): 12 Motorola CP200D digital radios | |||
Event: 70 Motorola CP200D digital radios | |||
== Motorola CP200D Digital UHF == | |||
[[File:Cp 200d front 500x500px.jpg|frameless]] | |||
The radios themselves are extremely simple. There are only three controls you need to know: | |||
[[File:Cp200d controls.png|frameless]] | |||
# The '''Push To Talk''' button: (2) in the diagram above. | |||
# The '''Power/Volume Control''' knob: (8) in the diagram above. | |||
# The '''Channel Selector''' knob: (9) in the diagram above. | |||
The microphone and speaker are on the front. | |||
== Channels == | |||
# SAFETY1 | |||
# TAC1ICS | |||
# Sanctuary | |||
# Board | |||
# DPW | |||
# LNT | |||
# GGGP | |||
# GTFO | |||
# Accessibility | |||
# Wake | |||
# TAC2 | |||
# TAC3 | |||
<br /> | |||
{| class="wikitable" | |||
!Ch # | |||
! | |||
! | |||
|- | |||
|1 | |||
|SAFETY1 | |||
| | |||
|- | |||
|2 | |||
|TAC1ICS | |||
| | |||
|- | |||
|3 | |||
|Sanctuary | |||
| | |||
|- | |||
|4 | |||
|Board | |||
| | |||
|- | |||
|5 | |||
|DPW | |||
| | |||
|- | |||
|6 | |||
|LNT | |||
| | |||
|- | |||
|7 | |||
|GGGP | |||
| | |||
|- | |||
|8 | |||
|Accessibility | |||
| | |||
|- | |||
|9 | |||
|Wake | |||
| | |||
|- | |||
|10 | |||
|TAC2 | |||
| | |||
|- | |||
|11 | |||
|TAC3 | |||
| | |||
|} | |||
Revision as of 13:18, 1 June 2019
This page describes the 2019 rental radio setup. For information on 2018 and earlier radios, see Radio Tech 2018.
Radio Equipment/Rentals
We're renting radios from Event Radio Rentals.
Work Weekend 2 (Placement): 12 Motorola CP200D digital radios
Event: 70 Motorola CP200D digital radios
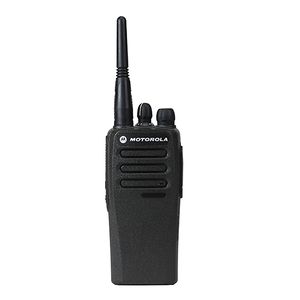
Motorola CP200D Digital UHF
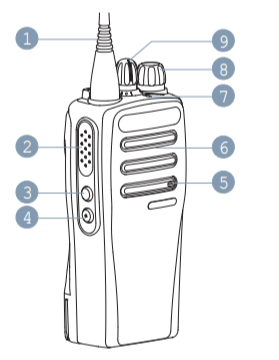
The radios themselves are extremely simple. There are only three controls you need to know:
- The Push To Talk button: (2) in the diagram above.
- The Power/Volume Control knob: (8) in the diagram above.
- The Channel Selector knob: (9) in the diagram above.
The microphone and speaker are on the front.
Channels
- SAFETY1
- TAC1ICS
- Sanctuary
- Board
- DPW
- LNT
- GGGP
- GTFO
- Accessibility
- Wake
- TAC2
- TAC3
| Ch # | ||
|---|---|---|
| 1 | SAFETY1 | |
| 2 | TAC1ICS | |
| 3 | Sanctuary | |
| 4 | Board | |
| 5 | DPW | |
| 6 | LNT | |
| 7 | GGGP | |
| 8 | Accessibility | |
| 9 | Wake | |
| 10 | TAC2 | |
| 11 | TAC3 |

